

As IOL designs and cataract surgical techniques have evolved, so have the strategies for managing a dislocated lens.
The earliest dislocated posterior chamber (PC) IOLs were often in the context of a ruptured central posterior capsule but without extensive zonular loss. Thus, repositioning commonly involved retrieving the IOL and placing its haptics in the ciliary sulcus. Other management approaches included exchanging the PC IOL for an anterior chamber IOL or using iris fixation sutures.1
Repositioning techniques using scleral sutures were developed in the late 1980s and multiplied in the 1990s.2 The increased variety of these techniques was likely due to broader or more frequent zonular loss, perhaps as a consequence of techniques to allow capsular bag fixation, including endocapsular phacoemulsification and hydrodissection. These fixation techniques were developed and applied in parallel with secondary IOL insertion or IOL exchange, and certain IOLs were even designed with this goal in mind.
The most recent advances in repositioning techniques include the sutureless Yamane procedure3 and the use of polytetrafluoroethylene (PTFE; Gore-Tex, W.L. Gore) sutures for four-point fixation of an Akreos IOL (Bausch + Lomb).4
Although these are important advances, IOL exchange can still be a lengthy procedure that can jeopardize corneal clarity, especially in patients with a history of corneal decompensation or keratoplasty. It may also be more challenging in patients who have undergone prior filtration surgery and therefore have limited residual virgin conjunctiva to work with.
Many, if not most, IOLs are amenable to scleral suture fixation with relatively simple modifications to a long-standing technique (Figure 1).

Figure 1. With a little ingenuity, this scleral suture technique can be easily adapted to most types of IOLs.
Image courtesy of Sepideh Omidghaemi, OD
Here are 14 pearls to help you optimize this technique and modify it to accommodate a wide range of IOL styles.
1. Respect the Conjunctiva
Preserve the continuity and integrity of this structure as if you were a glaucoma surgeon. The old adage that every step depends upon the successful completion of the previous step is true, and in this case the first step is ensuring that you have a good conjunctival site or that you adjust your incisions to optimize what conjunctiva remains.
2. Make the Right Flap
Prepare a 50% to 75% thickness scleral flap to allow you to bury the knot and the bulk of the fixation suture; don’t make the flap too thin. I prefer a triangular, limbus-based construction. The flap always seems to be smaller than you would expect, so an obtuse triangle with a broad base will leave more covering tissue.
3. Prepare and Place Convenient Fixation Sites
Ergonomically, it is most convenient to place the fixation sites at the 1:30 and 7:30 meridians, but site constraints might dictate otherwise. Either way, place the two sites 180° from each other to avoid difficulties with IOL centration.
4. Set the Stage Optimally
Perform a complete vitrectomy, unless it will jeopardize a more convenient retrieval with forceps when the IOL is still suspended anteriorly. If the IOL is completely dislodged and rests on the retina, elevate it using the vitrectomy machine on suction mode, which is safer than trying to grasp the IOL with forceps.
5. Use a Thick Suture and a Thin Needle
There has been concern that polypropylene sutures will degrade with time, which would be particularly problematic in a young patient. However, using 9-0 rather than 10-0 polypropylene avoids this complication. A 27-gauge needle is small enough to minimize postoperative leaking, but large enough to handle the polypropylene suture.
6. Watch Out For the Needle
Introduce the suture by threading it retrograde through the base of the flap, but take care to keep the needle end of the suture in front of the needle bevel to avoid amputating it during entry.
7. Place Fixation Posterior
Introduce the needle 3 mm posterior to the limbus. I used to aim 1 mm posterior to the limbus, striving to guide the haptic into the sulcus. Newer techniques, however, have demonstrated that IOLs are well tolerated slightly more posterior, and this positioning offers the benefit of less iris chafing and less refractive change, as it approximates the positioning of the originally intended bag fixation.
8. Loop the Inferior Haptic First
Once the inferior haptic is secured to the suture, the IOL hangs down so that you can reach the remaining haptic. If you do it the other way, it is difficult to find and manipulate the haptic, which is often obscured from view by the superior iris. Also, make sure the haptic orientation is accurate at this point.
9. Generate Slack When Looping the Haptic
Grasp the edge of the optic with intraocular forceps (mild impression marks usually resolve) to direct the haptic into the suture loop, rather than trying to lasso the haptic with the suture (Figure 2). It helps to generate some slack to make the loop, which can be done by inserting the needle maximally and then retracting it slightly. The suture will not come out of the sclera as much as the needle, leaving a convenient space between the needle shaft and the suture through which the haptic can be inserted.
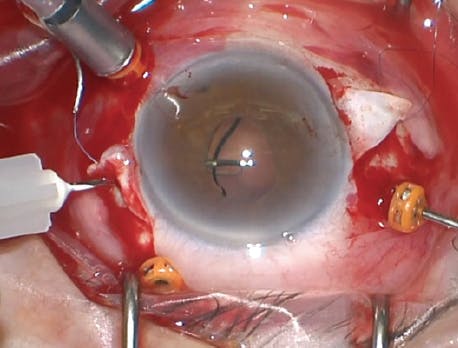
Figure 2. Sometimes, rather than lassoing the haptic, you can create the suture loop first, then thread the haptic through; this image shows a one-piece acrylic IOL.
10. Fixate the Suture to the Haptic Separately
Tie a knot snugly (but not too tight) so that the suture is attached to the IOL haptic. Subsequently, use a partial thickness pass to secure it to the sclera, providing room for adjustment of the IOL positioning (allowing the knot to prolapse internally) to optimize centration.
11. Leave Long Suture Ends
Doing this will help the ends lie flatter, presenting a less pointy profile to the conjunctiva. This lessens the risk of erosion, even if the suture ends extend beyond the edge of the scleral flap.
12. Take Care with Conjunctival Closure
Again, channel your favorite glaucoma surgeon to avoid a fistula, retraction, or buttonhole.
13. Maximize the View
Don’t hesitate to use iris hooks or an expander in the presence of small pupils. Generally, this is necessary only if the pupil is less than 2 to 3 mm in diameter.
14. Inspect the Retina
Iatrogenic tears or mobilized capsular or cortical remnants are easily addressed before closing.
SUTURING TIPS IN PRACTICE
The ideal IOL design for scleral suture repositioning is a three-piece IOL. However, the basic framework discussed here may apply to other IOL types. With a toric IOL, for example, the location of the flaps (ie, fixation meridian) can be adjusted to optimize postoperative correction. On one-piece acrylic IOLs such as the AcrySof SA60 (Alcon), the ends are thicker than the middle of the haptics, and this feature often allows them to be repositioned using the steps described here.5
Other one-piece IOL designs, such as the Tecnis Symfony (Johnson & Johnson Vision), feature tapered haptics, but there is often a notch at the haptic-optic junction around which the suture can be looped.6
Certain IOLs, such as the Crystalens (Bausch + Lomb), have much larger haptics. With the help of forceps or a needle, you can free up additional suture slack internally to allow easy lassoing of even these large haptics.
Finally, adapting the PTFE suture method,4 a four-loop Akreos IOL can be scleral-fixated with polypropylene suture instead, albeit with slightly more internal maneuvering.7 In this instance, the suture is introduced through a partial thickness scleral slit approximately 2 clock hours beyond the flap, through the superior hole, then retrieved with 25-gauge forceps through the scleral flap bed, inserted through the inferior hole, and externalized. The needle end is then passed through partial scleral thickness counterclockwise from the slit to the flap, where the united ends can be sutured while the tension is adjusted to allow IOL centration.
Respecting the basics of good technique in scleral suture fixation for dislocated IOLs will help you to maximize results not only for the IOLs typically encountered, but for an expanded variety of lens designs.
1. Stark WJ, Michels RG, Bruner WE. Management of posteriorly dislocated intraocular lenses. Ophthalmic Surg. 1980;11(8):495-497.
2. Kim SS, Smiddy WE, Feuer W, Shi W. Management of dislocated intraocular lenses. Ophthalmology. 2008;115(10):1699-1704.
3. Yamane S, Sato S, Maruyama-Inoue M, Kadonosono K. Flanged intrascleral intraocular lens fixation with double-needle technique. Ophthalmology. 2017;124(8):1136-1142.
4. Patel NA, Shah P, Yannuzzi NA, et al. Clinical outcomes of 4-point scleral fixated 1-piece hydrophobic acrylic equiconvex intraocular lens using polytetrafluoroethylene suture. Clin Ophthalmol. 2018;12:2145-2148.
5. Leung EH, Mohsenin A, Smiddy WE. Scleral suture fixation technique for one-piece acrylic intraocular lens. Retina Cases Brief Rep. 2018;12(3):251-253.
6. Echegaray JJ, Smiddy WE. Scleral suture fixation of dislocated posterior chamber intraocular lens: modification for tapered haptics. Published online June 29, 2020. Retina.
7. Fan KC, Smiddy WE. Rescuing an Akreos 4-point haptic intraocular lens: a novel surgical technique. Published online March 3, 2021. Retina.


_1773249222.png?auto=compress,format&w=75)


