


Advanced diabetic eye disease produces some of the most challenging cases in vitreoretinal surgery. Fibrovascular proliferation results in complex vitreoretinal adhesions, tractional retinal detachments (RDs), tractional retinoschisis, and combined tractional-rhegmatogenous RDs. Each eye is unique, and surgical strategies need to be dynamic and flexible, with good decision making the key to optimal outcomes.
Teaching and learning fibrovascular tissue dissection in these cases is challenging. Our approach is based on established principles of learning theory. First, ensure a thorough understanding of the pathology of the vitreoretinal interface. On this foundation, build surgical (dexterity) and mental (decision making) skills, and then reinforce the learning with appropriate post-surgical review and audit.
PREOPERATIVE ANALYSIS AND SURGICAL PLANNING
If media clarity allows, perform a preoperative clinical analysis with the trainee. A widefield color image is particularly useful. For example, pockets of subhyaloid hemorrhage will identify focal hyaloid separation. In cases of vitreous hemorrhage, discuss the ultrasound findings. Combining fundus imaging, ultrasound, and possibly OCT can be helpful to analyze and characterize the vitreoretinal interface (Figure 1).
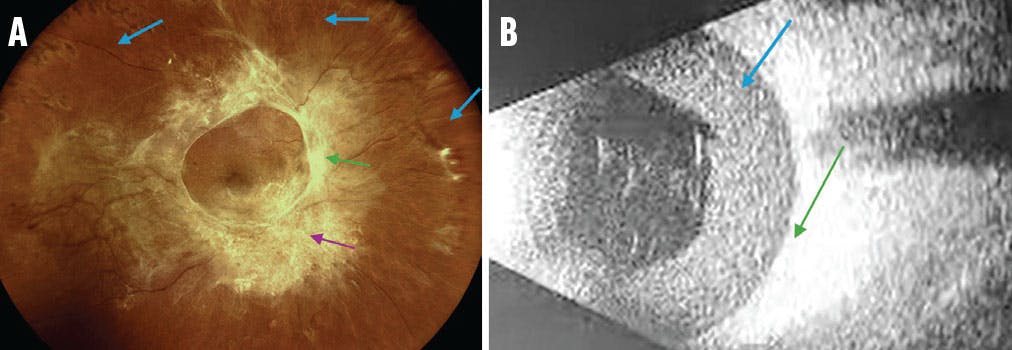
Figure 1. In this color fundus photograph (A), notice the absence of a peripheral PVD, which creates a challenge because it will be difficult to induce a PVD using usual techniques (blue arrows). The image also shows the firm attachment to the optic disc (green arrow) and complex attachments in broad areas of fibrosis (purple arrow). The B-scan ultrasound (B) of a different patient obtained preoperatively shows an extensive posterior hyaloid detachment with a subhyaloid hemorrhage (blue arrow). You can ask trainees to identify the macula (green arrow) and look for traction and adhesions (not present in this image).
TEACHING SURGICAL SKILLS
We break the dissection strategy into clear steps, each with specific goals, and teach the surgical techniques necessary to achieve each step. Many techniques can be conceptualized and practiced with simulation (Table). In our practice, we use the Eyesi Surgical Simulator (Haag-Streit GmbH). We recommend that trainers observe and instruct during simulation sessions to maximize the trainee’s development. Here are the steps we teach.

Step No. 1: Access the Correct Surgical Dissection Plane
Following a thorough core vitrectomy and midperipheral trim, identify where best to gain access to the correct surgical plane (the subhyaloid space). In the absence of hyaloid separation, decide where to initiate a focal posterior vitreous detachment (PVD) and which instrument to use (Figure 2).

Figure 2. There are several options for gaining access to the correct surgical plane in the absence of a PVD: 1. Use the vitrector if the underlying posterior hyaloid face is loose enough to be elevated by aspiration (usually away from fibrosis; blue arrows); 2. Use forceps to lift a thin fibrotic area with a small circular motion, which may snap weaker attachments and generate a focal separation (often at the edge of fibrosis or near the disc; green arrows); or 3. If the posterior hyaloid face is particularly taut but slightly elevated off the retina, a pick may be most efficient to pierce and open the posterior hyaloid face (usually away from fibrosis; purple arrow).
Commonly, a partial posterior hyaloid separation is present (Figure 3). Be aware that long-standing, preexisting hyaloid separation allows for proliferation of secondary membranes at the hyaloid-retina junction. Unless you identify and lift these, you will fail to find the fibrovascular bridges (pegs) that indicate the correct plane (Figure 4).

Figure 3. This image highlights a preexisting partial PVD (A) and a generated focal PVD (B). The arrows indicate the desired extension of the hyaloid separation.
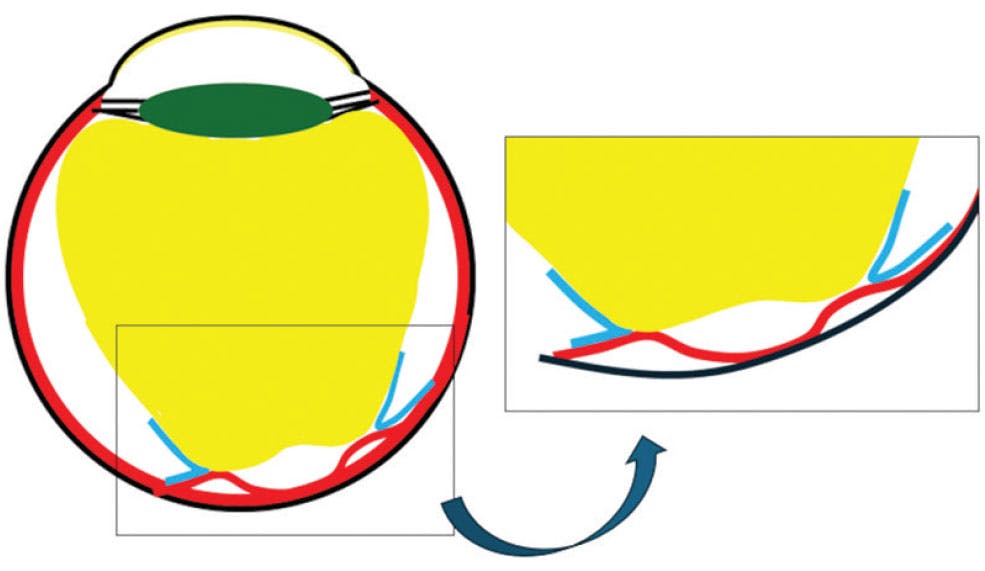
Figure 4. Secondary membranes (blue) must be lifted from the retinal surface to access the dissection plane.
Step No. 2: Extend the Posterior Hyaloid Separation
When the peripheral hyaloid is already detached in one region, or when a new separation has been generated focally using Step 1, the PVD should be actively extended outside the adherent complexes for 360°, if possible. A clear sign that you are in the correct plane is that the peripheral membrane edges start to elevate and mobilize.
A useful maneuver to separate the adherent posterior hyaloid face (done in regions without an obvious white fibrovascular complex [FVC], as indicated by the arrows in Figure 3) is to grasp the free-cut edge of the posterior hyaloid face using gentle aspiration of the vitrector and make a slow forward, then anterior, and then retrograde movement, similar to the shape of the letter C (Figure 5). This generates tension on the adherent posterior hyaloid face, causing it to lift for a short distance ahead of the vitrector, while not excessively straining the tight posterior FVC adhesions and vitreous base insertion, limiting the risk of breaks at these locations. The lifted posterior hyaloid face is then removed with the vitrector and the maneuver repeated at the new adherent edge.
Sometimes, thick FVC extending from the posterior pole to the ora serrata may prevent 360° separation. In these cases, segmentation through the fibrotic sheet should ideally be performed to release the anterior-posterior traction.

Figure 5. The edge of the hyaloid face is gently held (aspirated) with the vitrector and slowly pulled antegrade (A), vertically (B), and retrograde (C; red arrows), causing the hyaloid detachment to extend (green arrows). The motion limits traction on the adhesions as the distance from the instrument to the adhesions remains relatively constant (blue arrows).
Step No. 3: Trim the Loosened Hyaloid and Elevated FVC Edges
A successful peripheral hyaloid separation will result in lifted membrane edges and hyaloid remnants. Trim these with a fold-over technique where the vitrector is positioned on top of the membranes facing the loosened tissue, drawing it in with gentle aspiration and removing it with low risk of retinal breaks.
Step No. 4: Segment the Residual Posterior Fibrovascular Sheets
If the hyaloid and any secondary membranes at the vitreoretinal junction have been lifted, the correct surgical plane of peg-like adhesions can be accessed. Use the vitrector to segment where possible (Figure 6). We have found that a smaller-gauge beveled cutter can more easily access gaps between adhesions and work closer to the retina. Very small lifting movements (similar to the C-pull) can be useful to open and extend the surgical plane ahead of the cutter.

Figure 6. Although vertical scissors can be used to practice segmentation (A), small-gauge beveled cutters are very effective for this step (B). Note the trimmed edges of the membrane following successful 360° peripheral hyaloid separation, and trim (arrows).
Step No. 5: Explore the Edges of Residual Complexes and Consider Removal From the Disc
Use forceps to lift and explore the adhesions of the remaining fibrovascular tissue (Figure 7). This technique may expose more gaps for segmentation or break weaker adhesions. Consider whether the residual complexes need to be removed or left in place and the edges cauterized.
Assess the complex attached at the optic disc. If this can be gently removed, it will often reveal small slips of membrane extending over the papillomacular bundle, which will also peel off. If the adhesion to the disc is too strong, leave it attached to avoid disc trauma. In these cases, try to leave the fibrovascular stump long enough for safe cauterization, if needed.

Figure 7. Using a simulator, retina fellows can use the epiretinal membrane setting to explore with forceps.
Step No. 6: Bimanual Surgery
Clinically significant residual membranes (eg, membranes still affecting the macula or adjacent to retinal breaks) can be difficult to remove with one-handed techniques, especially on a detached retina. Bimanual surgery is effective in these complex scenarios. We use end-grasping forceps and curved scissors. The tip of the scissors should not be too sharp, as much of this technique involves using the closed scissors as a spatula to expose the surgical plane around adhesion points. Lift the scissors slightly into the membrane while cutting to avoid damage to the underlying retina or vessel (Figure 8).
Other important steps in diabetic vitrectomy not discussed here include hemostasis, the management of subretinal fluid, laser, and the role of tamponades.
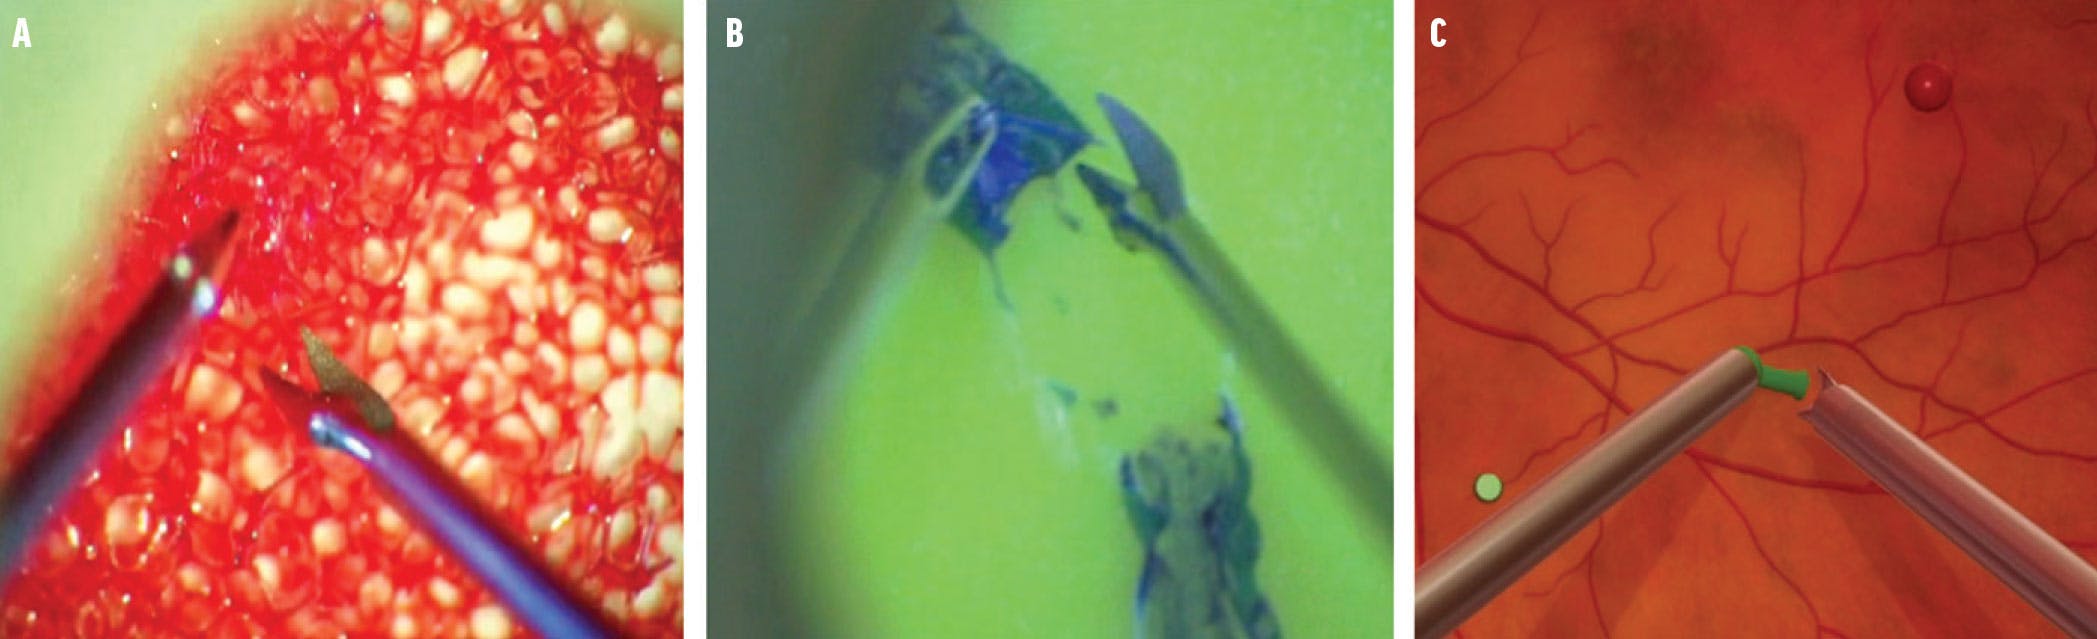
Figure 8. Simulation tools for bimanual surgery training include cutting a sponge, which simulates pegs (A); cutting a membrane (B)1,2; and simulated (Eyesi Simulator) bimanual scissors training without forceps (C).
REVIEW, AUDIT, AND REINFORCE
Review the surgical video shortly after completing the procedure, and discuss the decisions made during the surgery and other possible options. Identify weaker surgical skills and target these for practice.
The trainee should keep a surgical log of individual surgical steps, with proficiency ratings from the trainer, so that areas needing more attention can be identified and addressed. Trainers can also encourage trainees by identifying skills that have improved toward competence.
SIMULATORS ON THE MARKET
In addition to the Eyesi Surgical Simulator (Haag-Streit GmbH), ImmersiveEducation (Immersive Touch) also includes a vitreoretinal interface. For trainees interested in cataract surgery, the PhacoVision (Melerit Medical), HelpMeSee Eye Surgical Simulator (HelpMeSee), and Fidelis Virtual Reality Ophthalmic Surgical Simulator (Alcon) focus on anterior segment surgery.1,2
1. Khullar S, Mishra SK, Joshi A, Sati A, Kumar P, Unni D. Eye on the Future: virtual reality surgical simulator. Delhi J Ophthalmol. 2023;33(3):250-254.
2. Soni T, Kohli P. Commentary: Simulators for vitreoretinal surgical training. Indian J Ophthalmol. 2022;70(5):1793-1794.


_1784132761.jpg?auto=compress,format&w=75)


